I have been making some additions to the fruitful material already in LOTOW and the expansions. Having purchased a big ol' pack of Mountain Men from Foundry not long ago (seems most've been discontinued?) I thought I'd have a crack at making some rules to go along with them. Using LOTOW as a base, I have a few ideas that I want to share and, with some input from the community, grow them into something I can put out as a complete document.
So, here is what I've got so far... please note that most of this requires a lot more work. All feedback would be really appreciated.
These rules are only really applicable in the Huntin' Scenario. This can be played with two or more players, or even solo. You may need to have several Mountain Men prepared to make a hunting party, but I would like to make it possible to play with just one character.
At the beginning of the game, a nominated player must roll a scatter/directional dice for wind direction. This doesn't have much of an effect until later in the gae (you will see later on). This arrow is the predominant wind direction for the rest of the game, but can change.
Weather types are also generated at the beginning of the game, comprising: clear day, light rain, heavy rain, snow. It can be day time or night time.
On each player's turn - but after rolling for priority - a D6 is rolled. If a 1 is rolled, player must consult the following table for the outcome:
- Caught in a bear trap (ouch!)
- Ambush 1: D6 bullets/arrows come flying out of the trees.
- Ambush 2: D6 opponents appear (indians or unfriendly trappers)
- Change in the weather
- Change in the wind
- Disorientation (player misses a turn)
A major part of setting up the Huntin' scenario is the placing of "track" counters on the gaming table. These are small objective counters representing paw/hoof prints, snapped twigs, poop, or perhaps the remains of last night's dinner guest. The main objective for the hunters is to "capture" these counters and accumulate points.
Once collected, the player rolls a D6: on a 1, the hunter loses the track and must begin again; on a 2-5 the hunter collects a point and moves on; on a 6, the hunter is ambushed by a beast (probably a bear or something nasty).
Once these points reach a designated goal (5, f'rinstance) the tracked beast is spawned in a random direction. If the line drawn by the direction of the wind cross the path of the hunter and the beast, the beast is aware of the hunter and may dash off (if it is a deer or something) or gain a charge action and attack the hunters.
I am working on a set of Huntin' Skills for players to develop their hunters in a campaign.
I've also put together some simple stats for a Grizzly Bear (basically a watered-down cave troll):
F = 5, S = 5, G = 5, A = 2, W = 3, P = 4
Fearsome Reputation: Players must pass a Guts test before charging.
Looking forward to hearing some feedback or any ideas you might have.

Sunday, September 11, 2011
Saturday, August 27, 2011
WIP Hag pt. 3
So, after reading some of the suggestions I got to work and came up with this:


Hope you like it! I always appreciate the feedback, so let me know what you reckon! At this stage I'm looking to put it into production. How exactly that will work with her current pose I'm not sure. I guess I'll be learning as I go... anyone want to shed some light on this potential problem?


Hope you like it! I always appreciate the feedback, so let me know what you reckon! At this stage I'm looking to put it into production. How exactly that will work with her current pose I'm not sure. I guess I'll be learning as I go... anyone want to shed some light on this potential problem?
Friday, August 26, 2011
WIP Hag
So, here is the next step, her dress. I've got the bottom done and I think it looks okay. What do you think?


It is starting to make a bit more sense to me now. But, for my first attempt at a full sculpt I'm pretty happy. So, what do you think I should put in her arms? I had an idea for a staff, or perhaps a book? Any suggestions?


It is starting to make a bit more sense to me now. But, for my first attempt at a full sculpt I'm pretty happy. So, what do you think I should put in her arms? I had an idea for a staff, or perhaps a book? Any suggestions?
Wednesday, August 24, 2011
WIP Hag pt. 1
Hi everyone.
It has been a little while since any meaningful update has been made, but I have been working on something... it is a little bit secret. But, in between secret business I have been making some more terrain, and trying my hand at sculpting a whole figure.
Here is the start of what will turn out to be a witch:

I am aiming for an end result that isn't stuck in any particular genre, but that can be used from fantasy to modern gaming. There seems to be a lack of "modern" witch figures (as far as I know, anyway!) and wanted something along the lines of the witches that feature in the Hellboy tale "The Crooked Man".Not your typical, pointy-hatted variety, but more gypsy-like.
I'll have to wait for the greenstuff to dry before I commence the next step, but I will probably be adding clothes soon.
So, let me know what you think! Any tips?
Sunday, July 10, 2011
Updates on the Intergalactic Games website!
Hello all,
Just a quick plug for my website. Be sure to check out some of the new features we've been working on. There's a brand new look to the Gallery, with lots of stuff to come in the following weeks.
There are also some new products: some great new releases from Lead Adventure Miniatures, as well as some Laser Cut Leaves and awesome Plastic Crates ready to throw on the gaming table.
Also, you can sign up to the newsletter for more updates, and some special "How To" tutorials by me!
I am now also currently open for any commission work you might want for terrain, objective markers, obstacles and miniature conversions (but no miniature painting, sorry!).
So check out www.intergalacticgames.com.au to find out more.
Sunday, June 26, 2011


Thursday, June 16, 2011
Ye Olde Inne - A work in progress
Another piece I have been putting together for a [i]long [/i]time. Finally put some paint on it over the last couple of weeks (very little paint, over very many days):

 And with some Perry WOTR figures coming any day now, this should see some use. I'm also looking forward to using it for any Fantasy, Napoleonics, Pulp, Horror... you name it!
I am planning on building some more to go with it, and will hopefully end up with a small hamlet one day. And while I have plenty of jungle bases, I only have one or two forest-type bases... it will be fun to put together some more.
So what's to go on this one? Window grills on the empty ones, a few hinges and mossy growth all around the place.
Tuesday, May 31, 2011
Greetings from the Iberian Peninsula.
As you can see this hasn't been updated for some time!
While the Steamer stays moored in the construction yard, I have been playing with some conversions based on the Sharpe series. Here are some of them:


 A French officer with his trusty steed and mutt (Dragoon body and horse, Line Infantry officer head, British officer sword arm... if you're wondering).

That's all for now! The next update will have a few more Napoleonics, and even some Warhammer Fantasy *gasp*
While the Steamer stays moored in the construction yard, I have been playing with some conversions based on the Sharpe series. Here are some of them:
Another Rifleman, based on Isaiah Tongue (has he made an appearance here before?)
A foppish British officer (I have given him a French head from the Line Infantry boxed set)
I am also working on a British Sapeur to use for the Songs of Drums and Shakos rules. Really looking forward to some Napoleonic skirmishing in the near future. But for now, it's a little bit at a time! I had put this stylish adobe house together quite some time ago... now I might actually get to use it!
That's all for now! The next update will have a few more Napoleonics, and even some Warhammer Fantasy *gasp*
Tuesday, April 5, 2011
Colonial steamer... pt. 9 Back to our regular program
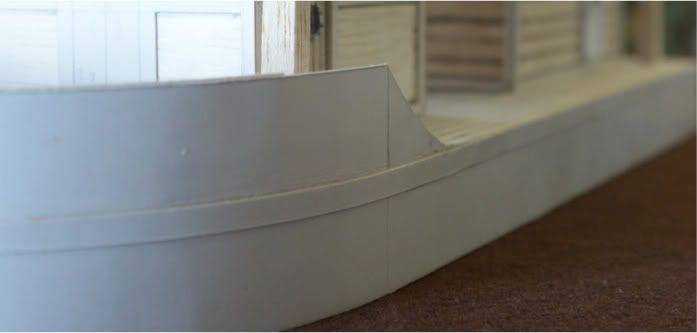
Well, after a bit of work, here is what we have so far:


As you can see, I've reinforced the edge. I've still got the rim of the prow to go, so I'll be cutting plenty of cardboard in the next couple of days.
As you can see, I've reinforced the edge. I've still got the rim of the prow to go, so I'll be cutting plenty of cardboard in the next couple of days.
Friday, April 1, 2011
Launching into the unknown.... Intergalactic Games
Well, it has been a bit quiet around here... but I have definitely been up to something!
With Intergalactic Games I am getting out there with custom terrain pieces as well as the fabulous Lead Adventure Miniatures. There is much more to come in the way of hobby and modelling accessories - some things in the works even now that I know you will like!
It's a place to get creative and see things come to life. So check it out, find out a bit more about what I'm planning to do:
http://intergalacticgames.com.au/
This is going to keep being my personal blog, so don't sweat it!
So, back to the usual program...
Friday, March 11, 2011
Colonial steamer... pt. 8 The Saga Continues
Hi everyone!
Not a huge update today, but an idea of my "next steps". I have been adding rivets to the cabins, as you can see. Just to bulk it up a little bit. I won't be doing much more to the actual cabins in terms of modelling detail, I will be doing more work on that with paints instead.
I did add a rim around the bottom deck to beef it up - a nice little tip from Jim Bibbly over at LAF. I'll be adding rivets all around the ship, including the hull.
But for now, on with the pictures!


Overall I'm pleased with the progression of the ship. I really just have to sit down and finish building it, rather than just working in dribs and drabs! I'll be working on the exhaust pipe next, and planning a few little additional details like cargo, anchors, and a few more suprises!
Until next time, here's a sneak peek of what I've been cooking up for the next part of the Colonial project...

Not a huge update today, but an idea of my "next steps". I have been adding rivets to the cabins, as you can see. Just to bulk it up a little bit. I won't be doing much more to the actual cabins in terms of modelling detail, I will be doing more work on that with paints instead.
I did add a rim around the bottom deck to beef it up - a nice little tip from Jim Bibbly over at LAF. I'll be adding rivets all around the ship, including the hull.
But for now, on with the pictures!
Overall I'm pleased with the progression of the ship. I really just have to sit down and finish building it, rather than just working in dribs and drabs! I'll be working on the exhaust pipe next, and planning a few little additional details like cargo, anchors, and a few more suprises!
Until next time, here's a sneak peek of what I've been cooking up for the next part of the Colonial project...

Wednesday, March 2, 2011
Colonial steamer pt. 7
Finished a fair bit of work on the pilothouse. The outer layer is done with cardboard, the rest of the structural work is obviously balsa. The searchlight on the top is a Reviresco piece. The sun shades on the sides are stowage pieces from a Tamiya 1/48 kit, and the front window is made out styrene held up by paperclips.


And that's the pilothouse. I have some accessories to place inside, and some interior decorating planned but that's for another day.
And in the grand tradition of men riding strange animals, here's another picture:

And that's the pilothouse. I have some accessories to place inside, and some interior decorating planned but that's for another day.
And in the grand tradition of men riding strange animals, here's another picture:

March is... er, Colonial month, what?
Well I've decided to keep calm and carry on with my Colonial steamer during March, as well as doing some work on The Battle of Frogonia.
Not much else to say about this, I'm afraid. So, here's a picture to keep in the spirit of things:

Not much else to say about this, I'm afraid. So, here's a picture to keep in the spirit of things:

Sunday, February 27, 2011
Colonial steamer pt. 6a - "Toot toot", indeed.
Just a small update for this evening. I am nowhere near having this finished this weekend (it is Sunday evening now and time for bed). However, some nice progress was made tonight courtesy of the lovely Painting Princess. However, I haven't got any photos.
What I did take were some photos of the things I'll be using to liven up the build - accessories mostly. I thought it would be a nice bit of eye candy while you're waiting for a real update.
First up, the bits box. Followed by some bags of Reviresco gear (portholes and rails) and some close ups of the Faller plastic crates and Boot Hill goodies.


And there was one slight modification to the ship. I have now placed the larger cabin at the back, and the smaller cabin to the fore of the ship. This will allow me to play around with a boiler and staircase without interfering with my plans for the top-deck big gun/cargo/pavillion area.
I may just make a small room to accomodate the pipe, or have an exposed boiler. Still tossing the idea around... maybe you can give me some suggestions?

 And for another diversion, I have put together a small expeditionary force that will (hopefully) use the ship for their travels through the Congo and beyond.
1 x Hero (he's in the picture)
10 x Askaris (Trained, Leader)
8 x Tribal musketmen (Raw)
10 x Tribal warriors/cannibals (Raw, Leader)
1 x Gatling gun with 3 crew (Trained)
That's the plan anyway... they are going to be Belgians, at this stage. The only problem is that my Askari unit is only half Blegian models, the others are generic. So we'll see... later. Much later.
Goodnight, everybody!
What I did take were some photos of the things I'll be using to liven up the build - accessories mostly. I thought it would be a nice bit of eye candy while you're waiting for a real update.
First up, the bits box. Followed by some bags of Reviresco gear (portholes and rails) and some close ups of the Faller plastic crates and Boot Hill goodies.
And there was one slight modification to the ship. I have now placed the larger cabin at the back, and the smaller cabin to the fore of the ship. This will allow me to play around with a boiler and staircase without interfering with my plans for the top-deck big gun/cargo/pavillion area.
I may just make a small room to accomodate the pipe, or have an exposed boiler. Still tossing the idea around... maybe you can give me some suggestions?
1 x Hero (he's in the picture)
10 x Askaris (Trained, Leader)
8 x Tribal musketmen (Raw)
10 x Tribal warriors/cannibals (Raw, Leader)
1 x Gatling gun with 3 crew (Trained)
That's the plan anyway... they are going to be Belgians, at this stage. The only problem is that my Askari unit is only half Blegian models, the others are generic. So we'll see... later. Much later.
Goodnight, everybody!
Tuesday, February 22, 2011
Colonial steamer pt. 6 - Toot toot.
Just a small update for now. I have put together the basis for where the ship's wheel and other gadgets will go (I have no idea of the names for these things). I think the proportions are just about right. All that's left is to do some detailing on the cabins such as the cardboard panels on the outside and possibly a life-saver or something. I have been fossicking about for suitable stowage and other tidbits. Got a pretty good collection happening which you will see as the work progresses.
Of course there is also the back of the top deck, the gun platform/sun shade, and the paddle which is proving to be a bit of a challenge. I've got just about everything else I need to finish this off. Will it get done by the weekend? Well, let's see, shall we?
So, without further ado (I have heard someone say this as adieu in the past, but he was a manager of mine so I kept mum about it) here are the latest photos!


Oh, the fun that's going to be had when this s all done! For now, I'll just have to settle for "pew pew" and "toot" noises.
Goodnight, everybody.
Of course there is also the back of the top deck, the gun platform/sun shade, and the paddle which is proving to be a bit of a challenge. I've got just about everything else I need to finish this off. Will it get done by the weekend? Well, let's see, shall we?
So, without further ado (I have heard someone say this as adieu in the past, but he was a manager of mine so I kept mum about it) here are the latest photos!
Oh, the fun that's going to be had when this s all done! For now, I'll just have to settle for "pew pew" and "toot" noises.
Goodnight, everybody.
Monday, February 21, 2011
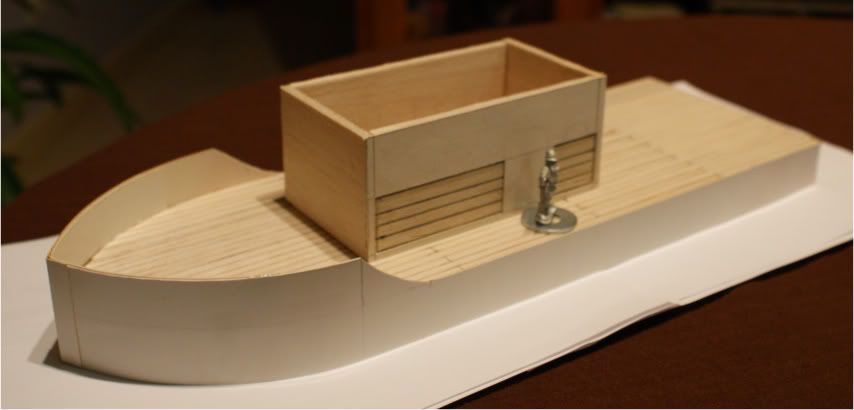
Colonial steamer pt. 5
Finally, some photos!
I put some miniatures in place for a better idea of the size of the boat. I've still got a fair bit to go, but there's no rush. Although, I would love to get it on the gaming table sooner rather than later!
I added a fore deck to put the gun on (which I will magnetise) and just be a generally useful place to put miniatures. It sure can fit a lot of them!


And that's about it for now. I'm aiming to have this finished by the end of the weekend, so it's all hands on deck until then!
I put some miniatures in place for a better idea of the size of the boat. I've still got a fair bit to go, but there's no rush. Although, I would love to get it on the gaming table sooner rather than later!
I added a fore deck to put the gun on (which I will magnetise) and just be a generally useful place to put miniatures. It sure can fit a lot of them!
And that's about it for now. I'm aiming to have this finished by the end of the weekend, so it's all hands on deck until then!
Wednesday, February 16, 2011
Colonial Steamer pt. 4
Some more pictures. I hope you like them!


So, plans are going well. I have also received some great little items from Eureka and Reviresco to make it a little more authentic: some deck guns, coils of rope, swivel guns, ship wheel, compass and search light, and about 50 rails. I'm also working on some boiler-style doors for the cabins. I'm tossing up whether to cast the basic door I have already made and then detail the duplicates, or just produce duplicates of it from styrene.
I'm going to be detailing the aft cabin next, followed by the Captain's cabin on the top deck. I really, really, can't wait to get this beast on the gaming table!
Monday, February 7, 2011
Colonial steamer pt. 3
Here's some more photos of the first set of cabins/boiler room or whatever the deuce you call it:

Just a bit of a teaser as to what's coming up. It's look a bit tall from what I remember of the original plans...
Just a bit of a teaser as to what's coming up. It's look a bit tall from what I remember of the original plans...
Colonial steamer pt. 2
Here's a bit of an update on the steamer project.
I glued down the decking on the original base, as well as on the extension. This has resulted in a crooked mess but I have cleverly hidden this with the cardboard strip around the outside and some filling with putty and more slivers of cardboard.Measure twice, cut once, and all that.
So I'm still deciding what to name her. But as she will most likely be a Belgian ship, I was thinking Belle Epoque (literally a "beautiful age" of society and culture named in hindsight regarding the period from the end of the Franco-Prussian War to the beginning of WW1), and have her painted up as a ship that has long since passed her glory days.
And on with the pictures:


So, the next steps are:
1) Bottom level of cabins;
2) Middle-deck, pillars to hold it up etc.
3) Top level of navigator's cabin and the passenger/big gun area
4) All manner of knick-knacks and ship parts (just did a quick stop over at Reviresco)
5) A crew, most likely.
So, plenty to go and lots more to come!
I glued down the decking on the original base, as well as on the extension. This has resulted in a crooked mess but I have cleverly hidden this with the cardboard strip around the outside and some filling with putty and more slivers of cardboard.Measure twice, cut once, and all that.
So I'm still deciding what to name her. But as she will most likely be a Belgian ship, I was thinking Belle Epoque (literally a "beautiful age" of society and culture named in hindsight regarding the period from the end of the Franco-Prussian War to the beginning of WW1), and have her painted up as a ship that has long since passed her glory days.
And on with the pictures:
So, the next steps are:
1) Bottom level of cabins;
2) Middle-deck, pillars to hold it up etc.
3) Top level of navigator's cabin and the passenger/big gun area
4) All manner of knick-knacks and ship parts (just did a quick stop over at Reviresco)
5) A crew, most likely.
So, plenty to go and lots more to come!
Subscribe to:
Posts (Atom)